
This blog opens as I’m deeply into the construction of an N scale railroad for George. Benchwork, track, wiring, and rough scenery are complete, and I’ve got ground cover on one end of the railroad. Right now I’m doing the masonry work—more on that in the next post. After that, it’s the remaining ground cover, trees, structures, and other finishing touches, before I deliver it to George’s living room.
George called me up some months back. He was looking to have a railroad built, and one of my friends at the hobby shop had referred him to me. George is retired, and has some health issues that limit his ability to start a layout from scratch. We met at his place, he showed me his collection of N scale equipment, and his present layout, which he purchased second-hand. That layout was built with Kato Unitrack, and it’s laid pretty well, but George likes six-axle diesels, autoracks, double-stacks, and passenger cars—rolling stock that doesn’t do well on 9-3/4″ and 11″ curves. After some discussion, I proposed a 36″ x 60″ railroad, with an over-and-under twice-around oval, with 13″ curves. Scenery would be rural, with a small farm at one end. The focal point would be a Central Valley Pratt Truss bridge, the one with all that exquisite lattice work. George agreed to the proposal, and I got to work.
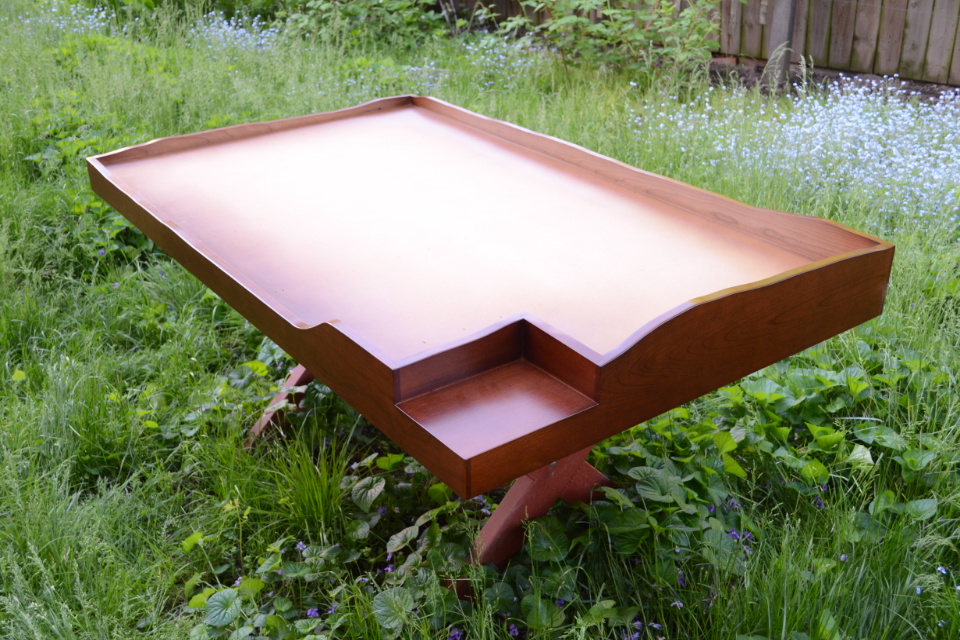
Most of my past railroad projects have been done in red oak. It’s a very common species of hardwood, it looks good, stands up to the abuse of train-show life quite nicely, and takes any color finish you want. Shortly after I got the Gopher Valley Central into a reasonable state of completion, I took a job at a furniture shop that used red oak for 95% of its products. Needless to say, a lot of small offcuts were stashed under the workbench for use in projects. A few months before George called, I switched employers again. This shop does hardly any red oak at all, but does use a lot of cherry, maple, and walnut. George plans to place the completed railroad on a dark-finished hardwood table he has in the living room. Cherry looked like a good match to me, and a nice change of pace from red oak as well, so that’s what I built it in. I took some of the company’s finish samples and laid them on his table, picked the closest match, and had our finishing person shoot the railroad with that finish. (She charged me three dozen homemade chocolate-chip cookies for doing the job.)
The railroad’s stucture follows the same recipe I’ve used in the past. A solid deck (1/4″ MDF, in this case), dadoed into hardwood fascias, is reinforced underneath with poplar cross-members. Elevated subroadbed (again, 1/4″ MDF) is supported every six inches by pine blocks. Perhaps this is overkill in an era when many modellers simply lay track over Woodland Scenics’ excellent foam risers, but I’m not concerned. This method is a little more work, a little more weight, but amply solid. The GVC was built this way, and after ten years and trips to dozens of shows, is holding up beautifully.
Once the subroadbed was in place, I laid cork, then flextrack. This is the kind of project that Atlas code 80 flex is well-suited for. As some of you may know, Atlas has been having some severe supply difficulties in the last few years. More often than not, the pegs on the hobby-shop wall where the Atlas stuff is supposed to be are empty. After George okay’d the project, the first thing I did was head for the hobby shop and buy their entire supply of Atlas code 80 flex—four pieces. (Five, if you count the battered one that they threw in for free.) Cleaned ’em right out. Added to the stash I had, there was just enough to do the job. I had about six inches of flextrack left over.
One entire piece of that precious flextrack was allocated for the truss bridge and its approaches. The bridge itself is about 11″ long, so I carefully cut off that much of the tie strip from the middle of that piece, and staked the rails to the bridge ties. There is no rail joint within 8″ of the bridge. Rail joints on curves were soldered; those on straight track were left loose to accommodate any expansion or contraction in the rails. I installed four sets of feeder wires. There is no point on the railroad where an unsoldered rail joiner must carry power—every such joiner has feeders on both sides.
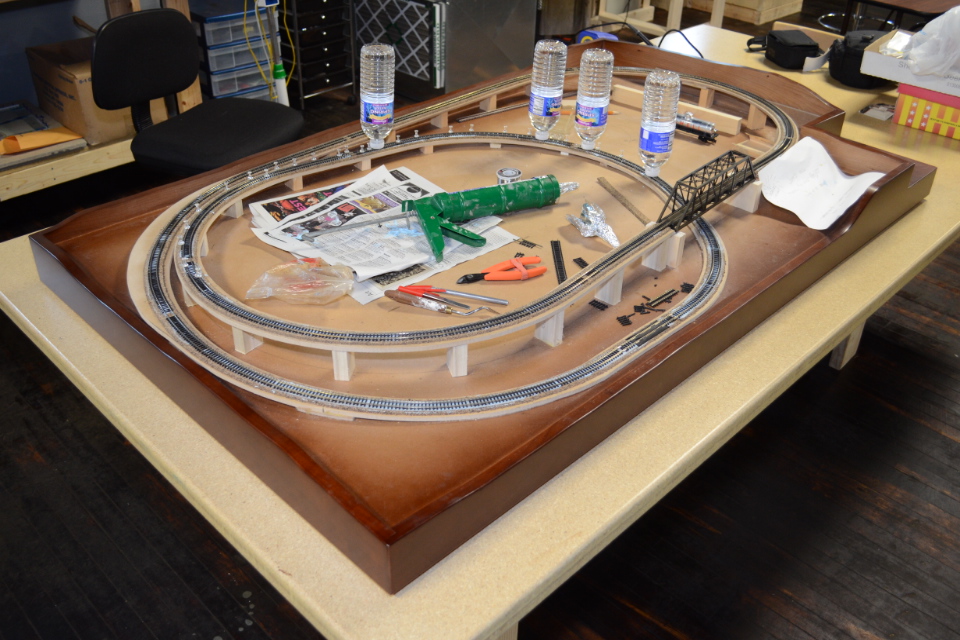
After a few leisurely sessions of test-running (one in the presence of our member of Congress, even) it was time to move on to scenery. I took sheets of extruded Styrofoam and fitted pieces around the subroadbed, stacking them up to the necessary height. The bandsaw was handy for this–Styrofoam can be scored-‘n’-snapped easily enough, but the bandsaw makes clean curved cuts easily. Cleaner cuts mean tighter joints, and less patching up with Sculptamold later. For the rough carving, I used my homemade hot-wire, which shaves away excess foam as though it were a large, blue block of cheese (albeit one that smells faintly like melting plastic). Some work with 60-grit sandpaper, then Sculptamold, refined the shape of the landscape. A quick coat of my favorite shade of flat-green latex paint, and the railroad is ready for masonry work.
