
Did you know that you don’t actually need a Digital Command Control station to run your decoder-equipped locomotives? Use the power pack you already have. Just turn the speed knob up all the way, and encode the commands manually by flipping the direction switch back and forth, at about 8,000 times per second. If you do the timings precisely enough, your decoder-equipped locomotives will respond appropriately. What could be simpler?
This does tend to be pretty hard on the direction switch, and most hobbyists find that their hands get tired after a minute or two. Using a microcontroller for encoding is far less stressful, and also automates the task of breaking a speed setting down into ones and zeros. An Arduino works pretty well for this, as it turns out. Load the proper code into it, and it will encode the necessary command packets on a square-wave signal.
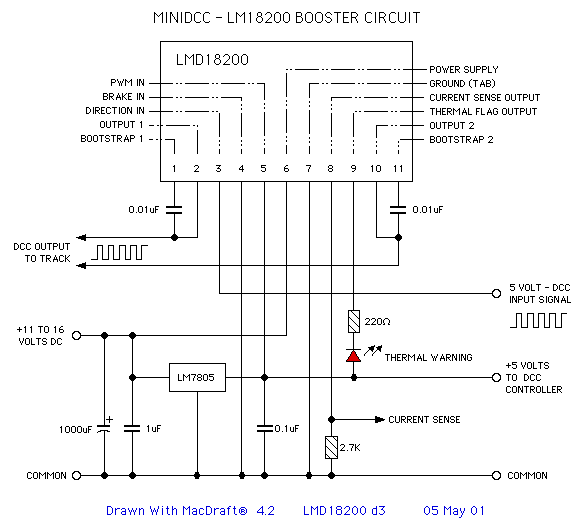
Now, you need a way to translate that signal into track current. An H-bridge motor driver chip is just the thing. There are reports of hobbyists using the readily-available L298 chip for DCC applications, although it isn’t quite up to the technical specs. The chip of choice, however, appears to be the LMD18200, which is has the necessary speed, as well as a 3-amp current rating. It also has built-in overcurrent protection and current sensing, which are handy features to have on a railroad. Jam one onto a board, solder on some supporting components, and hook it up to pin 9 on your Arduino.
You’ll need some kind of input device, too, to tell the Arduino how fast you want the locomotive to move, and in which direction. You have a world of choices here, from a basic potentiometer to environmental sensors to an internet connection. If you happen to have a SparkFun Joystick Shield laying around, it has a two-axis analog joystick, five (counting the joystick selector) pushbuttons, and attaches to your Arduino in seconds. Add the code necessary to translate the input into commands, and you’re on the move.
Some kind of indicator would be helpful, too. How about a four-digit, seven-segment LED display to show the current address? Just grab a Lite-On LTC-4727JR display, and a MAX7221 display-driver chip, and wire them in according to their datasheets.
Hey, look! You have a DCC system!
 Where it stands

As you can see from the photos, I’ve rigged together just enough hardware to do the job. Right now, I’m working on code. The actual tasks of assembling proper command packets, and broadcasting them, are being handled by the CmdrArduino library. My own code translates inputs from joystick and buttons, and makes the calls to CmdrArduino’s functions. I can store two addresses, recall them with the red and blue buttons, and reset them as desired with the joystick. The yellow and green buttons toggle functions F0 and F1, respectively. There’s still a lot more functionality I’d like to add, but what I have now can move trains, and that’s pretty exciting stuff.

My NCE PowerCab. Don’t get me wrong; it’s a great product and I love it. With 34 buttons and a thumbwheel, however, it looks as intimidating as a ’90s-era universal remote control.
So, you may be asking, what’s the point of all this? I already have a PowerCab. I don’t need to build a system from scratch. A fully-featured homebrew system would cost as much, or maybe a little more, than a commercial unit. Here’s why I’m doing it:
- This is a great way to learn how DCC protocols work.
- I have at least one layout project on my sketchpad that would benefit from having a tailored DCC system built right into it.
- I can build exactly the user interface—knob, joystick, gesture sensor, whatever—I want. My PowerCab has 34 buttons and a thumbwheel; do you really need all that just to run a train? Of course not.
By the time I’m all finished with this, I’d like to have tidy schematics, code, board layouts, and step-by-step instructions posted. If you already dabble in electronics, you don’t really need to wait for that—the pieces are out there, you just need to exercise some Google skills, track them down, and warm up the soldering iron.
There are some people who find the very concept of DCC intimidating. “What’s wrong with good ol’-fashioned straight DC?” they ask. “I twist the knob. I run my train. No problem.” If you’re just caboose-chasing under the Christmas tree, that’s fine. If you’re just working a Timesaver on your bookcase, that’s fine. If you aspire to a more sophisticated operating scheme, however, with multiple trains in motion, DCC is in your future. Nobody wants to flip block toggles anymore. DCC has been out there for nearly 20 years now, and it’s proven to be a robust and versatile control standard. If you need to get acquainted with the workings of DCC, what better way to do it than by building your own hardware? I have no formal training in electronics. Zero. If I can do this, you can do this.
